A few months ago, I did something “crazy”: I transformed Headscale—a project originally designed for single-node deployments—into a distributed system supporting cluster mode. The core change was elegantly simple: introducing a Cluster ID mechanism. With this ID, multiple Headscale instances now collaborate like Lego bricks, scaling horizontally without limits. Users no longer fear single-point failures, node counts can effortlessly surpass thousands, and—best of all—users can seamlessly switch nodes with a single click. The teacups from those late-night coding sessions still clutter my desk, but watching cluster traffic glide smoothly made every sip worth it.
Over the past month, I’ve dived into an even deeper challenge: multi-tenancy transformation. The mission was clear—to make Headscale operate like Tailscale’s official service, enabling isolated networks for multiple teams and clients. Imagine this: Marketing, Engineering, and an external contractor team each own their private network realm. Devices stay invisible across boundaries, policies are delegated per team, and billing splits cleanly by tenant. Technically, I implemented tenant isolation across authentication layers, data layers, and other critical components—all fused with our existing Cluster ID capability. This finally evolved the monolithic architecture into a true “cluster + multi-tenancy” dual-engine system. Today, it doesn’t just handle massive node loads; it ensures tenants coexist on the same physical node yet remain “blissfully unaware of each other’s existence.” We’ve crossed from a personal-SaaS tool into a unified platform serving both individuals and enterprises. Beyond this, months of applying Tailscale/Headscale in industrial settings have expanded our vision: our solution now scales from personal networks and enterprise IT to smart manufacturing and beyond.
Let’s be honest—this felt like rebuilding an airplane mid-flight. ACL policy collisions, tenant quota overflows, cross-cluster sync delays… bugs hunted me down relentlessly. But the moment two tenants’ devices came online simultaneously in the test environment—without a single byte leaking between them—sent a jolt through me sharper than dousing my face with ice water in winter.
Right now, the entire system is in intense development and debugging phases. Performance stress tests, audit trails, tenant self-service dashboards… these puzzle pieces are snapping into place. We’ve never stood closer to an enterprise-grade Headscale. I can’t wait to share the full blueprint with you soon. This time, the open-source world might truly sprout wings strong enough to rival commercial giants.
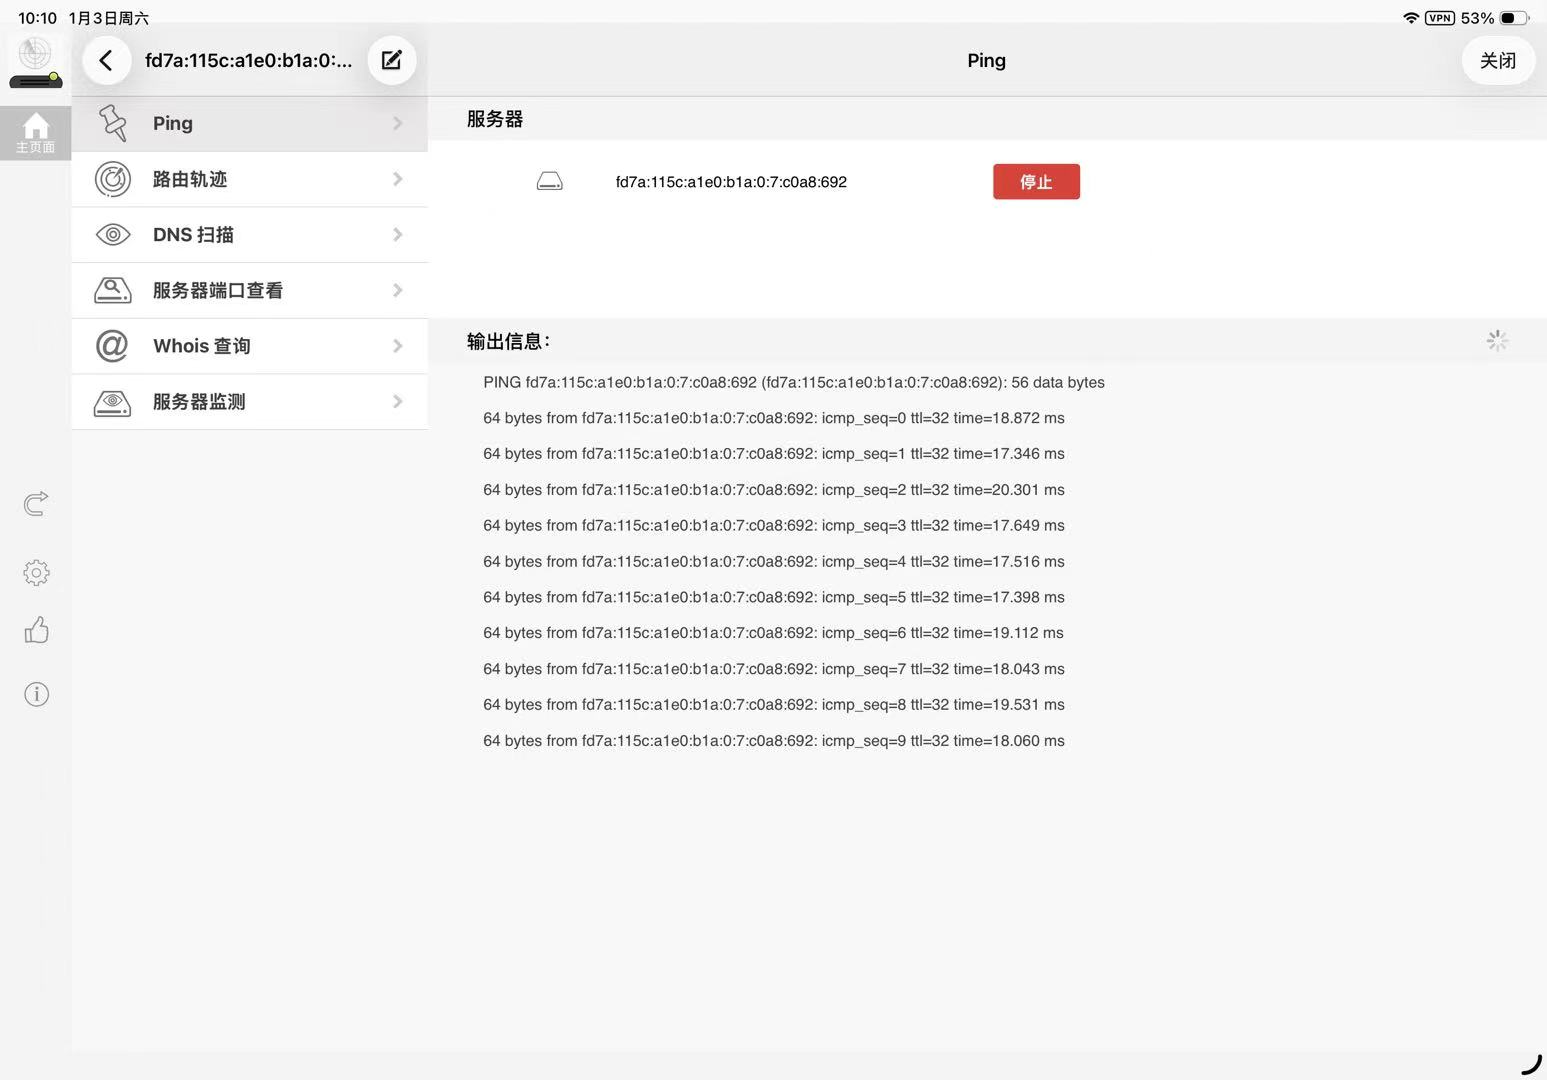
之所以必须先在 C 上向 A/B 发一次包,才会出现 A/B 能 ping 通 C,是因为 C 所在的网络是 hard NAT,Tailscale 需要在 C 主动发包时,借助 UPnP 在路由器上开一个稳定的外部 UDP 端口;在这个端口映射建立之前,A/B 主动打 C 找不到可用路径,一旦映射建立并被 headscale/客户端缓存之后,后续就可以随时主动连 C 了。
Audience: engineers, architects, and SREs already running headscale + Tailscale as a self-hosted control plane. TL;DR: With clusterID sharding + shared Postgres + an admission/control service + query isolation + incremental netmap, you can evolve single-process headscale into a horizontally scalable clustered service—functionally close to Tailscale’s SaaS model.
1) Current State & Problems
In many real deployments (especially with default/monolithic setups), headscale shows these limits:
Single tailnet; weak tenant isolation By default, there isn’t first-class multi-tenancy. Strong “tenant boundaries” (isolation, quotas, policies) are hard to achieve.
Single-process design; hard to scale horizontally As a monolith, headscale handles thousands of devices, but at tens of thousands the control-plane load (heartbeats, registration, policy changes, push fan-out) drives CPU/scheduling spikes.
Netmap recomputed on every device/state change Each device online/offline/heartbeat/ACL change triggers (near) full netmap recomputation. That O(N) cost at high event rates makes CPU the bottleneck.
These issues narrow the path to “SaaS-like headscale that serves 100k+ devices.”
2) Common Approaches: Pros & Cons
Approach A: One tenant = one headscale + one database
Approach B: Make upstream headscale truly multi-tailnet
Pros: aligns with the goal.
Cons: deep refactors across auth, data model, queries, caching, event bus, ACL interpreter, and netmap generator; even with multi-tailnet, a single process remains a bottleneck.
3) Our Scalable Solution (Linear Growth)
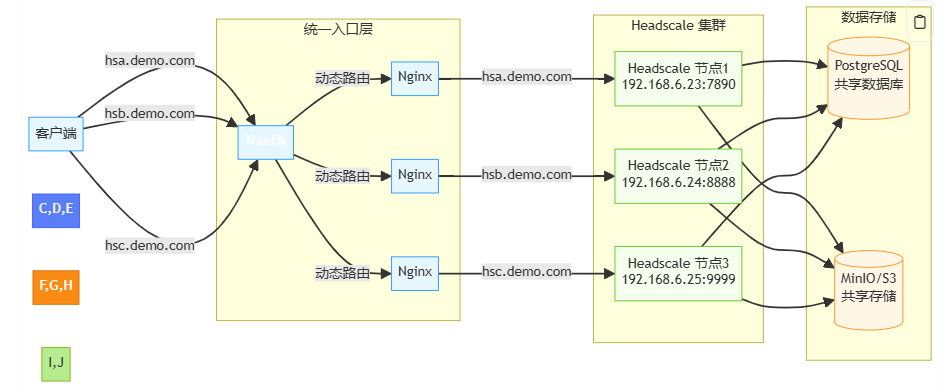
Core idea: Turn headscale into a shardable worker node. Each node has a clusterID. All nodes share one Postgres (or a PG cluster), but each node only sees rows for its clusterID. In front, run an Admission/Control Service (ACS) that assigns tenants/users to a clusterID on first contact (sticky), enabling horizontal scale-out.
Clients: On first join -> call ACS -> receive "available headscale address + clusterID + registration info" Then all traffic sticks to that node. New tenants are placed by ACS during scale-out.
Key points
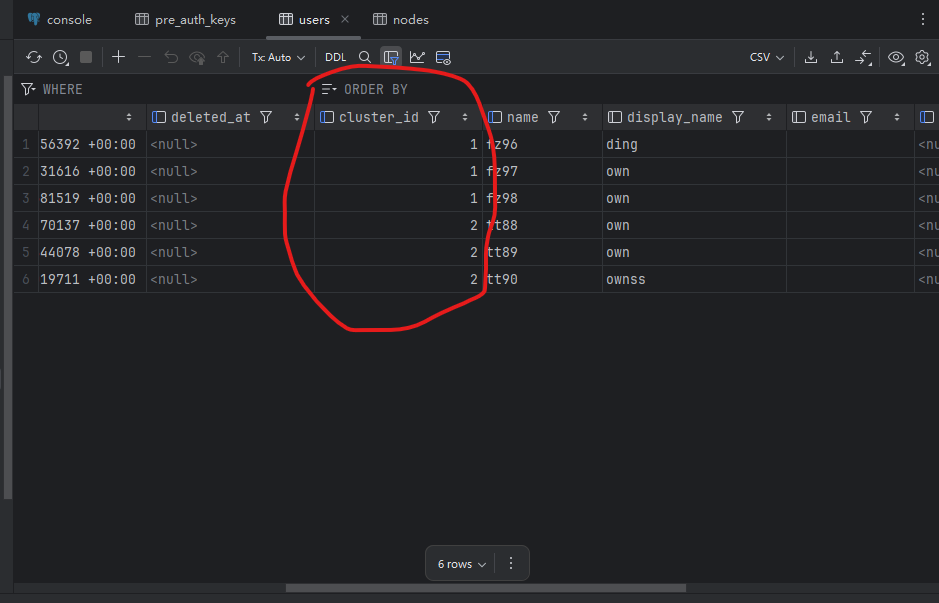
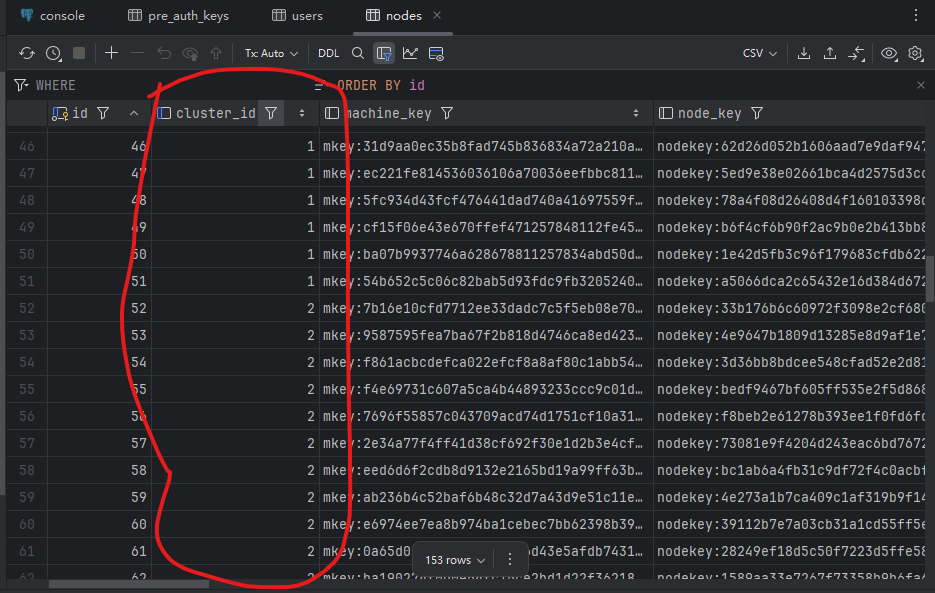
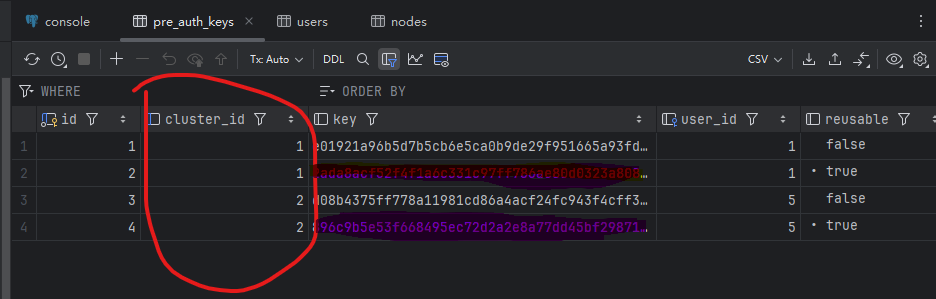
Shared Postgres, but every read/write is filtered by cluster_id, which logically shards one big DB.
Headscale nodes are “as stateless as possible”: durable state lives in PG; caches accelerate but are reproducible.
DERP map, OIDC, ACLs, keys, etc. are stored per tenant / per cluster; queries are isolated.
4) Critical Implementation Details
4.1 Database Changes
4.1.1 Add cluster_id to all tenant/device tables
Add cluster_id to tables for tenants/users/devices/keys/routes/ACLs/sessions/netmap metadata and create composite indexes.
Example (conceptual):
1 2 3 4 5 6 7 8 9 10 11 12 13 14
-- 1) Columns & defaults ALTERTABLE nodes ADDCOLUMN cluster_id TEXT NOTNULLDEFAULT'default'; ALTERTABLE users ADDCOLUMN cluster_id TEXT NOTNULLDEFAULT'default'; ALTERTABLE api_keys ADDCOLUMN cluster_id TEXT NOTNULLDEFAULT'default'; ALTERTABLE routes ADDCOLUMN cluster_id TEXT NOTNULLDEFAULT'default'; ALTERTABLE acl_policies ADDCOLUMN cluster_id TEXT NOTNULLDEFAULT'default'; ALTERTABLE preauth_keys ADDCOLUMN cluster_id TEXT NOTNULLDEFAULT'default'; ALTERTABLE device_sessions ADDCOLUMN cluster_id TEXT NOTNULLDEFAULT'default';
-- 2) Typical indexes CREATE INDEX idx_nodes_cluster_id ON nodes(cluster_id); CREATE INDEX idx_users_cluster_id ON users(cluster_id); CREATE INDEX idx_routes_cluster_u_drt ON routes(cluster_id, user_id, dest_prefix); CREATE INDEX idx_acl_cluster_u_rev ON acl_policies(cluster_id, user_id, revision DESC);
If you’re currently “one DB per headscale,” you can keep DB-level sharding for hard isolation—but shared PG + cluster_id gives better resource reuse and elasticity.
4.1.2 Enforce cluster_id in the data access layer
On process start, resolve CLUSTER_ID (env/flag).
Inject WHERE cluster_id = ? into every query via the ORM/DAO (e.g., GORM scoped query) or handwritten SQL.
Guard against “unscoped” queries (fail fast).
Go sketch:
1 2 3 4 5 6 7 8 9 10 11 12 13 14
type ClusterDB struct { db *gorm.DB clusterID string }
# Each headscale node starts with its own cluster_id CLUSTER_ID=A \ PG_DSN="postgres://..." \ DERP_MAP_URL="https://derp.example.com/map.json" \ ./headscale --config ./config.yaml
Propagate CLUSTER_ID to logs, metric labels, event topics, etc.
All internal logic operates only on this cluster’s data.
4.2.2 Incremental netmap + convergence
Problem: Full netmap recomputation is O(N); frequent triggers burn CPU. Fix:
Graph decomposition: model netmap as “nodes + ACL edges + route prefixes,” so any change maps to a limited impact set.
Impact tracking: when device X / ACL Y changes, only recompute for the affected subset (same user/tag/route domain).
Cache + versioning:
Maintain a netmap version per (cluster_id, tenant/user).
Cache results in memory (LRU) or Redis with signatures.
On push, only send when “subscriber_version < latest_version” (delta).
PG LISTEN/NOTIFY: triggers on change tables emit NOTIFY netmap_dirty (cluster_id, scope_key). Nodes LISTEN and queue work with debounce (50–200 ms).
type DirtyEvent struct { ClusterID string ScopeKey string// e.g., userID, tagID, or route domain }
func(s *Server) onDirty(e DirtyEvent) { if e.ClusterID != s.clusterID { return } // only handle my cluster s.debouncer.Push(e.ScopeKey) // merge changes 50–200 ms }
func(s *Server) rebuild(scopeKey string) { // 1) Find affected devices affected := s.index.LookupDevices(scopeKey) // 2) Rebuild netmap only for affected devices for d := range affected { nm := s.builder.BuildForDevice(d) s.cache.Put(d, nm) s.pushToDevice(d, nm) } }
This is the CPU game-changer. In real clusters we’ve seen 60–90% average CPU reduction.
4.3 Admission/Control Service (ACS)
Responsibilities
First-time admission and clusterID assignment (weighted by plan, geography, live load).
Returns the target headscale URL and registration parameters (e.g., derived AuthKey, OIDC URL).
Sticky placement: the same tenant/account consistently maps to the same cluster unless migrated.
Typical API
1 2 3 4 5 6 7 8 9 10 11 12 13 14 15
POST /api/v1/bootstrap { "account": "acme-inc", "plan": "pro", "want_region": "ap-sg" }
200 OK { "cluster_id": "A", "headscale_url": "https://hs-a.example.com", "derp_map": "https://derp.example.com/map.json", "auth_mode": "oidc", "note": "stick to cluster A" }
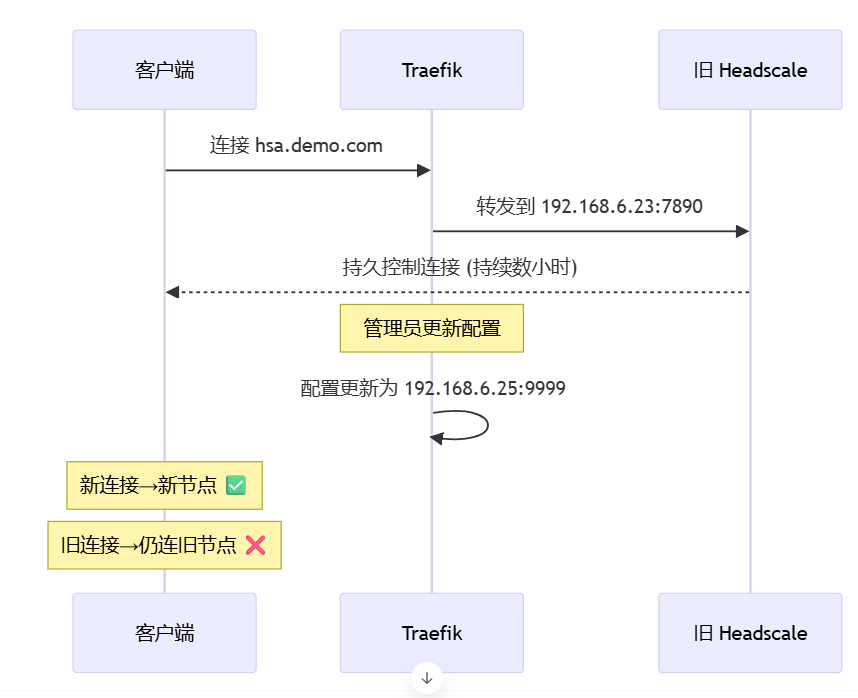
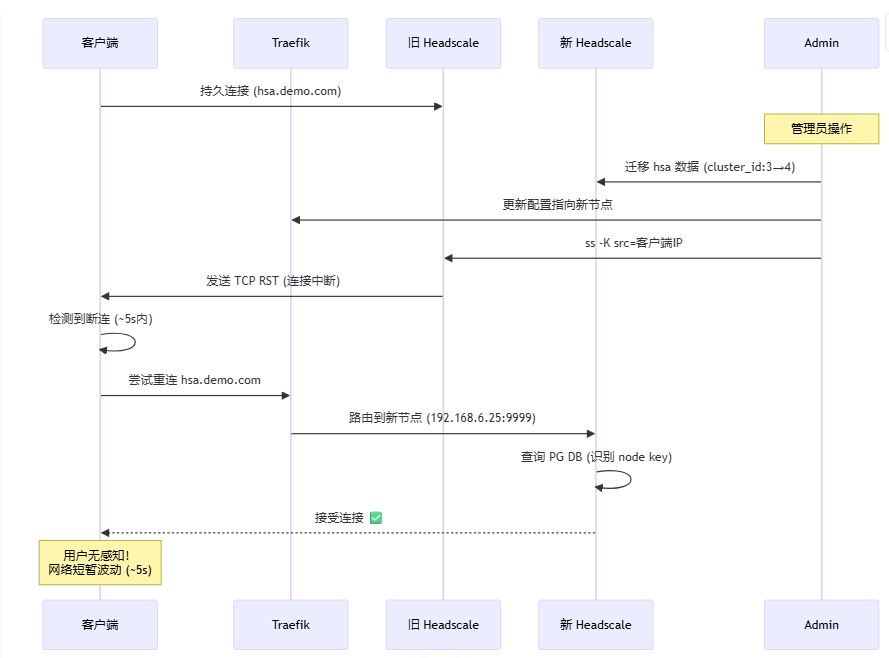
Placement algorithm: consistent hashing + load factors (CPU, session count, netmap backlog). Rebalance: ACS maintains “migration plans”; new devices go to new clusters; existing devices migrate in batches (see 6.3).
PG/PG cluster: primary/replica with streaming replication; partition tables by cluster_id or use partial indexes to handle hot tenants at high concurrency.
Caching: local memory + optional Redis (share hot sets across instances; faster recovery).
TLS/DERP: one DERP map entry point; deploy multiple DERPs by region; all headscale nodes share the same DERP map.
db := mustOpenPG(cfg.PGDSN) cdb := &ClusterDB{db: db, clusterID: clusterID}
srv := NewServer(cdb, clusterID) srv.Run() }
7.2 Guard against unscoped queries
1 2 3 4 5 6 7 8 9 10 11 12
// Every handler/usecase must use Server.scoped(), which enforces cluster_id func(s *Server) scoped() *gorm.DB { return s.cdb.Scoped() // internally adds WHERE cluster_id = ? }
// Panic in CI/tests if someone uses the raw DB without cluster filter var rawDBUsed = errors.New("raw DB use forbidden; must use scoped db")
funcMustScoped(db *gorm.DB) *gorm.DB { if !db.Statement.Clauses["WHERE"].Build(...) { panic(rawDBUsed) } return db }
7.3 LISTEN/NOTIFY for incremental work
1 2 3 4 5 6 7 8 9 10 11 12
-- Change trigger CREATEOR REPLACE FUNCTION notify_netmap_dirty() RETURNStriggerAS $$ BEGIN PERFORM pg_notify('netmap_dirty', json_build_object('cluster_id', NEW.cluster_id, 'scope_key', NEW.user_id)::text); RETURNNEW; END; $$ LANGUAGE plpgsql;
CREATETRIGGER trg_routes_dirty AFTER INSERTORUPDATEORDELETEON routes FOREACHROWEXECUTEFUNCTION notify_netmap_dirty();
Cross-tenant access: ACL interpreter forbids it by default; allow only via explicit “tenant-to-tenant allowlist.”
Key material: encrypt at rest in PG (KMS/HSM). Headscale nodes do not persist secrets locally.
Least privilege: ACS can only read/write tenant↔cluster mappings; no direct access to device sessions.
9) Aligning with a Tailscale-like SaaS
This design offers the SaaS core: multi-node control plane + shared state store + admission front-end.
ACS orchestrates new tenant onboarding;
Paid tiers map to different cluster strategies (shared vs. dedicated);
Failure domains and capacity scale by node;
Centralized monitoring, billing, and compliance.
10) Closing Thoughts
Turning headscale into a sharded cluster isn’t just “add more boxes.” The keys are:
Keep the data plane simple, make the control plane incremental;
Each node owns its shard; Postgres is shared but logically isolated;
The Admission/Control Service handles tenant orchestration and load placement;
Incremental netmap pulls CPU out of the “full-rebuild hell.”
With this in place, both single-tenant and multi-tenant deployments can achieve near-linear scaling—SaaS-like in practice. If you’re modifying source and aiming for production, share your load curves and topology—especially netmap hit rates and CPU deltas. Those usually decide whether you can push toward six-figure device counts.
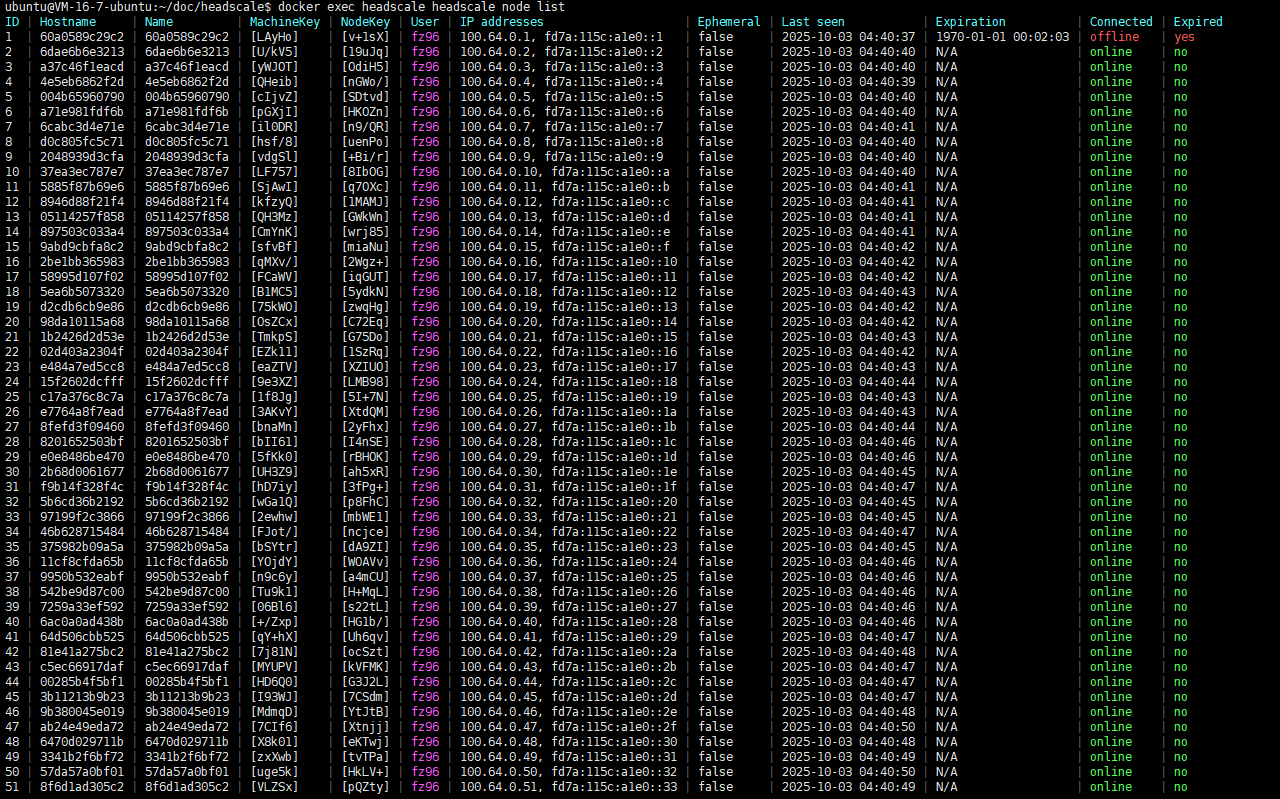
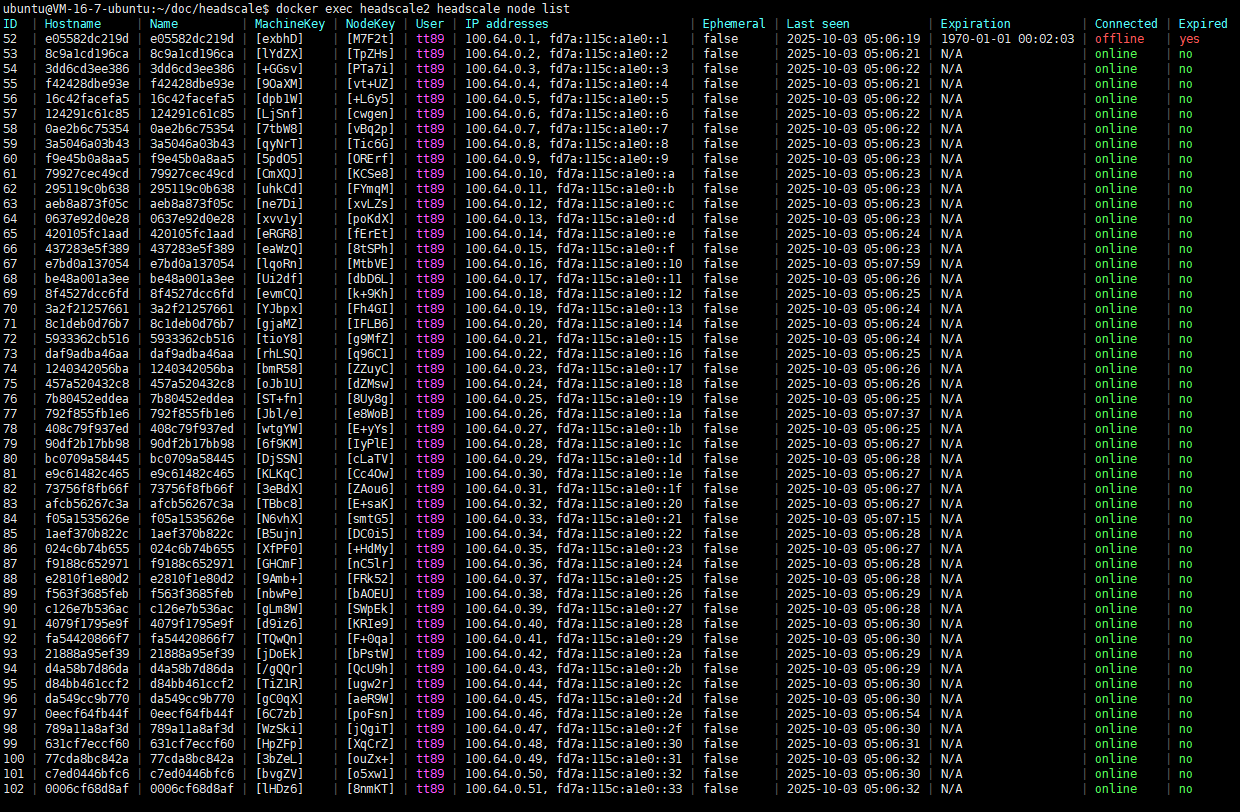
11) Demonstration
Deploy a two-node headscale using docker, create several users on each node, and then connect 50 clients. The two nodes share one PostgreSQL database.
-- 1) 字段与默认值 ALTERTABLE nodes ADDCOLUMN cluster_id TEXT NOTNULLDEFAULT'default'; ALTERTABLE users ADDCOLUMN cluster_id TEXT NOTNULLDEFAULT'default'; ALTERTABLE api_keys ADDCOLUMN cluster_id TEXT NOTNULLDEFAULT'default'; ALTERTABLE routes ADDCOLUMN cluster_id TEXT NOTNULLDEFAULT'default'; ALTERTABLE acl_policies ADDCOLUMN cluster_id TEXT NOTNULLDEFAULT'default'; ALTERTABLE preauth_keys ADDCOLUMN cluster_id TEXT NOTNULLDEFAULT'default'; ALTERTABLE device_sessions ADDCOLUMN cluster_id TEXT NOTNULLDEFAULT'default';
-- 2) 典型索引 CREATE INDEX idx_nodes_cluster_id ON nodes(cluster_id); CREATE INDEX idx_users_cluster_id ON users(cluster_id); CREATE INDEX idx_routes_cluster_u_drt ON routes(cluster_id, user_id, dest_prefix); CREATE INDEX idx_acl_cluster_u_rev ON acl_policies(cluster_id, user_id, revision DESC);