giffgaff一次写入小白卡成功,无esim手机也能用
无esim安卓手机申请 giffgaff 的 esim,然后写入到小白卡
无esim安卓手机申请 giffgaff 的 esim,然后写入到小白卡
介绍使用银联卡通过Google Play订阅Claude
介绍苹果ID改成土区,使用土耳其(土区)苹果ID充值ChatGPT
How I used hermes-agent, GitLab, and GitLab Runner to turn the Larktun documentation site from manual deployment into an automated release flow.
记录我如何用 hermes-agent、GitLab 和 GitLab Runner,把云雀通 Larktun 文档站从手动部署改造成自动发布流程。
I previously wrote an article on headscale unlimited scaling, covering how to transform headscale into a clustered deployment with near-unlimited device capacity.
The core idea is to assign each headscale instance a
client_id, and have all instances share a single database or database cluster.
Headscale Series: Building a Headscale Cluster for Near-Unlimited Device Capacity
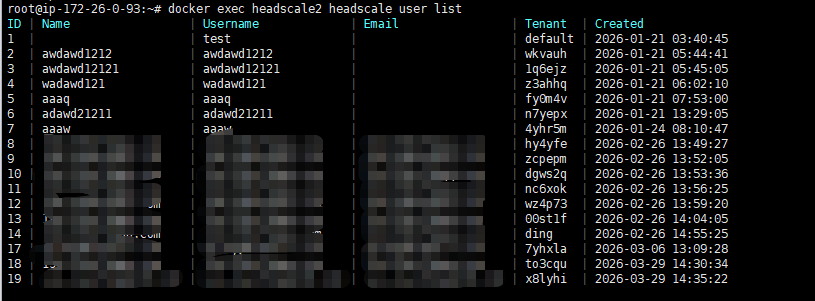
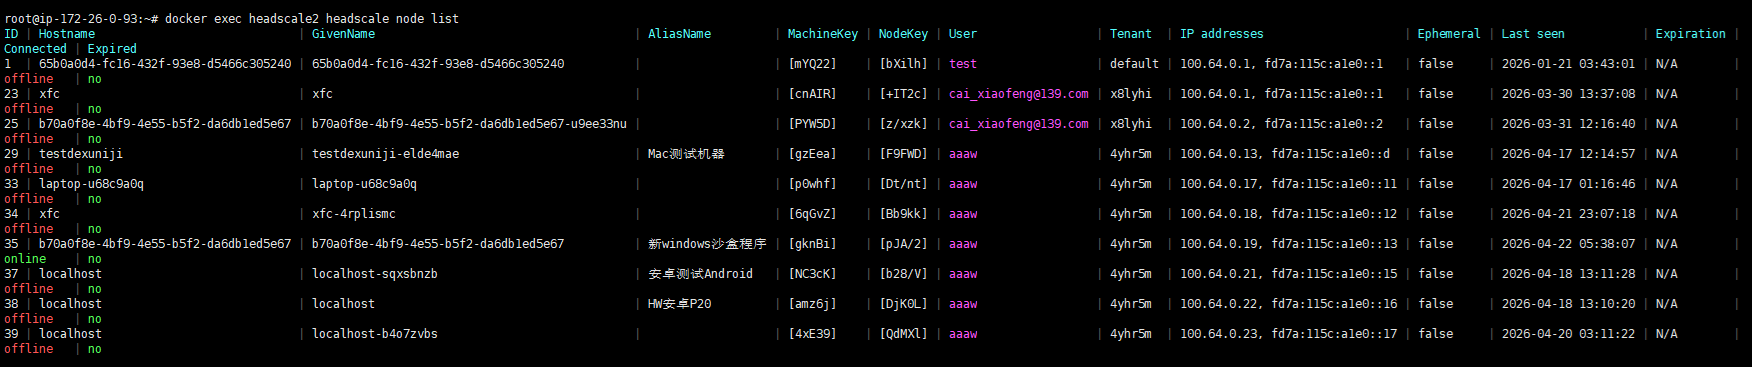
Today I’d like to share how to transform a single-instance headscale into a multi-tenant deployment (this post focuses mainly on showcasing results rather than deep technical explanation).
Headscale was originally designed as a single-instance, single-tailnet system. To support multiple tailnets within a single instance, the key is to isolate each tenant’s ACL, tailnet, routes, DNS, and more.
Each tenant has its own independent tailnet. The default address pool is 10.64.0.0/10, but it can be customized — for example, changed to 192.168.6.0/24 — depending on your requirements.
A
defaulttenant is reserved in the system. Users who do not need multi-tenancy can keep using headscale as before — all users will be automatically assigned to thedefaulttenant.
Each tenant has a fully independent ACL with access to the complete set of ACL features.
Each tenant’s routes are also independent and can be configured separately.
Host FQDNs follow the format hostname.<tenant_key>.<dns.base_domain>, where dns.base_domain is shared across all tenants.
The default tenant uses the default subdomain.
The command-line tools have been updated to support tenant functionality. Use -t to specify a tenant.
Each tenant can use the shared relay servers, or configure its own dedicated relay servers for complete isolation from other tenants.
A tenant field has been added to the system to distinguish between tenants.

介绍对 Headscale 进行多租户改造,ACL、路由、DNS等全隔离
hermes-agent 安装教程
This article explains how to build and package the Headscale source code yourself, and covers common errors that may occur during the build process along with their solutions.
C:\Users\XXX\Documents\develop\0me\headscale. Source code stored on the Windows filesystem.It is recommended to clone the repository using git rather than downloading a zip archive. When I tried to build from a zip archive, many errors appeared. I was ultimately able to produce an executable via go build -o headscale ./cmd/headscale, but make build could not complete successfully.
Use the following commands to download the source:
1 | git clone https://github.com/juanfont/headscale.git |
Then copy config-example.yaml from the root directory and rename it to config.yaml.
Enable WSL and install the Ubuntu distribution.
In your Windows user directory (e.g. C:\Users\XXX), create a .wslconfig file with the following content:
1 | [wsl2] |
Then restart WSL. This allows the Ubuntu environment to share your host machine’s VPN connection — which is required during the build, as many dependencies need to be downloaded from the internet.
Install the Multi-user edition of nix using the root account.
1 | sh <(curl --proto '=https' --tlsv1.2 -L https://nixos.org/nix/install) --daemon |
Reference: https://nixos.org/download/
Switch from the root account to a regular user account before building.
1 | # Enter the directory. Windows paths are accessible under /mnt/c/ in WSL |
Setting up the environment takes a while — please be patient.
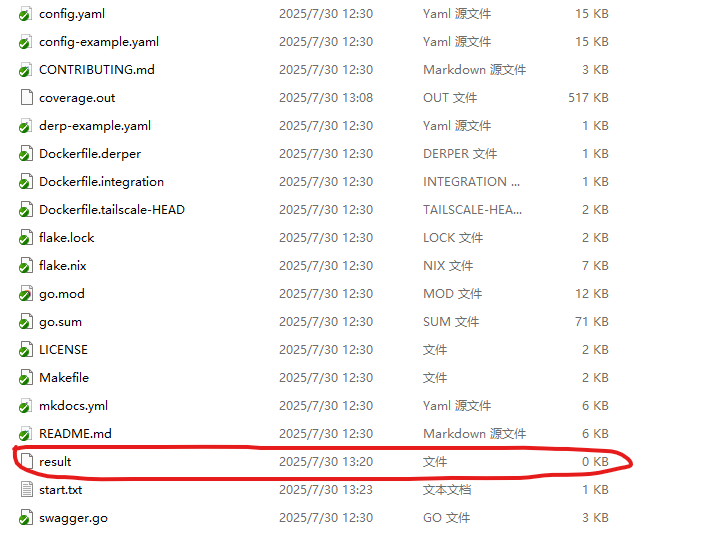
Once make build completes successfully, a result directory will appear in the project folder. When viewed from Windows it appears as a 0 KB file, but it is actually a directory in the Linux filesystem.

The compiled headscale binary can be run directly on the development machine. The following describes how to copy it to another server and run it there.
1 | # Inspect the binary using ldd or file |
From the console output above, we can see that headscale requires /nix/store/vbrdc5wgzn0w1zdp10xd2favkjn5fk7y-glibc-2.40-66/lib/ld-linux-x86-64.so.2 at runtime. This path is symlinked to /lib64/ld-linux-x86-64.so.2. For the program to run correctly, you need to manually create the /nix/store/vbrdc5wgzn0w1zdp10xd2favkjn5fk7y-glibc-2.40-66/lib/ directory and copy ld-linux-x86-64.so.2 into it.
In addition, a config.yaml file is required, along with the directories /root/.headscale/ and /var/lib/headscale/, which must be created and granted appropriate permissions.
1 | # Start command: headscale serve |
If you want to package the source into a Docker image, refer to the following link:
All of the following errors occurred when building from a downloaded zip archive. None of these issues appear when building from a git clone.
1 | # Following the official build steps with nix. make test succeeds, but make build fails with the error below: |
Edit the flake.nix file.
Change headscaleVersion = self.shortRev or self.dirtyShortRev; to:
1 | headscaleVersion = if self ? shortRev |
1 | djc@jetron-djc:/mnt/c/Users/DJC/Documents/develop/0me/headscale-0.26.1$ make build |
This error occurs because the build is interrupted by a test failure. The test fails because it cannot find the configuration file.
Build the binary directly instead:
1 | cp config-example.yaml config.yaml |
After a successful build, a headscale binary approximately 80+ MB in size will appear in the project directory.
1 | root@jetron-djc:~# nix develop |
This error occurs because the nix-command feature in Nix is experimental and disabled by default.
1 | # Edit the Nix configuration file |
Run the above command as root.
1 | root@jetron-djc:~# nix develop |
This error occurs because nix develop must be run from a directory that contains a flake.nix file. cd into your project directory and run nix develop from there.
1 | === Failed |
This error occurs because PostgreSQL’s initdb command cannot be run as root for security reasons. The test code attempts to initialize a database as root, which is rejected. Run make build as a regular (non-root) user.
1 | # Install Buf |
To speed up Bing’s indexing of your website, you can proactively submit URLs using IndexNow.
key .txt file in the website root directory so it can be accessed publiclytxt file containing all URLs on your site, then submit them using the scriptBing Webmaster ToolsThe following is a shell script for batch-submitting URLs to Bing IndexNow:
1 |
|
URL format inside baidu_urls.txt:
1 | http://www.ownding.com/2025/06/12/%E5%9C%A8%E6%9C%89%E5%85%AC%E7%BD%91IP%E7%9A%84%E6%83%85%E5%86%B5%E4%B8%8B%E5%A6%82%E4%BD%95%E5%AE%89%E5%85%A8%E5%9C%B0%E8%BF%9B%E8%A1%8C%E8%BF%9C%E7%A8%8B%E6%A1%8C%E9%9D%A2%E8%BF%9E%E6%8E%A5/ |
submit_to_bing.shHOST: Your website domainKEY: Your Bing IndexNow API keyKEY_LOCATION: The URL of your key verification fileURL_FILE: The path to your URL file1 | chmod +x submit_to_bing.sh |
1 | ./submit_to_bing.sh |